
To crawl a Shopify store with Screaming Frog, you need two things before you press start:
- A paid licence
- A crawler signature from your Shopify admin
Without the signature, Shopify starts blocking the crawl with 429 errors, and you end up auditing half a site without realising it. Once the crawl runs cleanly, most of what you’re looking for is Shopify-specific. That means duplicate URLs from collections, variants, and filters, broken links left behind by deleted products, default page titles, and apps adding content a basic crawl can’t see.
This guide covers both halves. The first section is setup, built around the mistakes that most often ruin a Shopify crawl. The second section covers what to check once the crawl finishes, where to find each issue in Screaming Frog, and what to do about it. After that, I cover which fixes to do first, what you can safely ignore, and how to stay on top of it. For the rest of your store’s SEO
The short version
- Buy a Screaming Frog licence. The free version stops at 500 URLs and won’t let you change the settings this guide relies on.
- Switch to database storage, mark Shopify’s CDN as internal, and keep filter, sort and variant URLs out of the main crawl.
- Create a crawler signature in Shopify and add it to Screaming Frog as HTTP headers. Make a new one before it expires.
- Crawl a sample of pages with JavaScript rendering, so apps can’t hide content from you.
- Then check duplicates, broken links, indexing signals, titles, images, structured data and hreflang.
- Fix by template rather than page by page, starting with the pages that make you money.
How do you set up Screaming Frog for a Shopify store?
A lot of Shopify audits go wrong before the crawl even starts. Each mistake below leaves you with a crawl you can’t trust. It might have gaps, be bloated with duplicates, or crash halfway through.
Is the free version of Screaming Frog enough for a Shopify store?
If you’re just starting out, it can be. The free version crawls up to 500 URLs. A new store with a small range, a few collections and a handful of pages can sit comfortably under that, so it’s a sensible way to run your first audit before paying for anything.
To check whether your store fits, add up your products, collections, pages and blog posts in the Shopify admin. Remember that a crawler also finds filter, sort, variant and tag URLs, and the free version can’t be told to skip them. If your crawl stops at exactly 500, open the URL tab. If most of what it found ends in ?variant=, sort_by= or a filter parameter, the limit went on duplicates rather than real pages.
The free version still covers a good chunk of the checks in this guide:
- 404s and broken menu or footer links
- redirects and redirect chains
- missing and duplicate titles and meta descriptions
- missing or multiple H1’s
- canonicals and noindex tags
- hreflang
It doesn’t include:
- custom extraction
- the custom headers the Shopify signature needs
- JavaScript rendering
- near-duplicate detection
- structured data validation
- the Search Console and GA4 connections
- segments, scheduling, crawl comparison, or saving and reopening crawls
Upgrade when any of these happen:
- your real pages pass 500
- you get 429s you can’t fix
- you want to rank fixes by revenue
- you want the crawl to run on a schedule
The rest of this setup section assumes a licence.
Screaming Frog Feature Comparison
| Feature | Free | Paid |
|---|---|---|
| Find Broken Links, Errors & Redirects | ✅ | ✅ |
| Analyse Page Titles & Meta Data | ✅ | ✅ |
| Review Meta Robots & Directives | ✅ | ✅ |
| Audit hreflang Attributes | ✅ | ✅ |
| Discover Exact Duplicate Pages | ✅ | ✅ |
| Generate XML Sitemaps | ✅ | ✅ |
| Site Visualisations | ✅ | ✅ |
| Crawl Limit | 500 URLs | Unlimited |
| Scheduling | ❌ | ✅ |
| Crawl Configuration | ❌ | ✅ |
| Save & Open Crawls | ❌ | ✅ |
| JavaScript Rendering | ❌ | ✅ |
| Crawl Comparison | ❌ | ✅ |
| Near Duplicate Content | ❌ | ✅ |
| Custom robots.txt | ❌ | ✅ |
| Mobile Usability | ❌ | ✅ |
| AMP Crawling & Validation | ❌ | ✅ |
| Structured Data & Validation | ❌ | ✅ |
| Spelling & Grammar Checks | ❌ | ✅ |
| Custom Source Code Search | ❌ | ✅ |
| Custom Extraction | ❌ | ✅ |
| Custom JavaScript | ❌ | ✅ |
| Crawl with OpenAI & Gemini | ❌ | ✅ |
| Google Analytics Integration | ❌ | ✅ |
| Search Console Integration | ❌ | ✅ |
| PageSpeed Insights Integration | ❌ | ✅ |
| Accessibility Auditing | ❌ | ✅ |
| Link Metrics Integration | ❌ | ✅ |
| Forms Based Authentication | ❌ | ✅ |
| Segmentation | ❌ | ✅ |
| Looker Studio Crawl Report | ❌ | ✅ |
| Free Technical Support | ❌ | ✅ |
| Price per licence (Anually) | Free | £199 Per Year |
Why does Screaming Frog get 429 errors on Shopify?
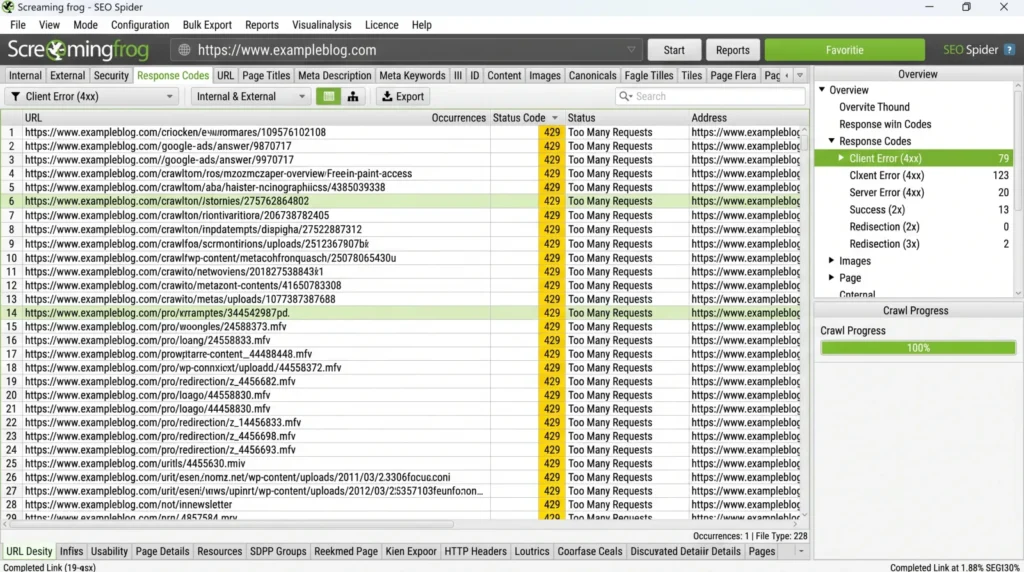
This is the problem Shopify users run into most. Shopify limits how quickly any one visitor can request pages, to protect stores from bots. Screaming Frog requests pages far faster than a shopper would. After a while, Shopify stops sending pages and returns a 429 Too Many Requests error instead (you may also see 430).
The crawl doesn’t stop. It carries on, logging errors where pages should be. So you can finish a crawl, see a tidy list of URLs, and never notice that a chunk of your product pages didn’t load. Check Response Codes > Client Error (4xx) after every Shopify crawl. If it’s full of 429s, the crawl is incomplete.
How do you set up a Shopify crawler signature?
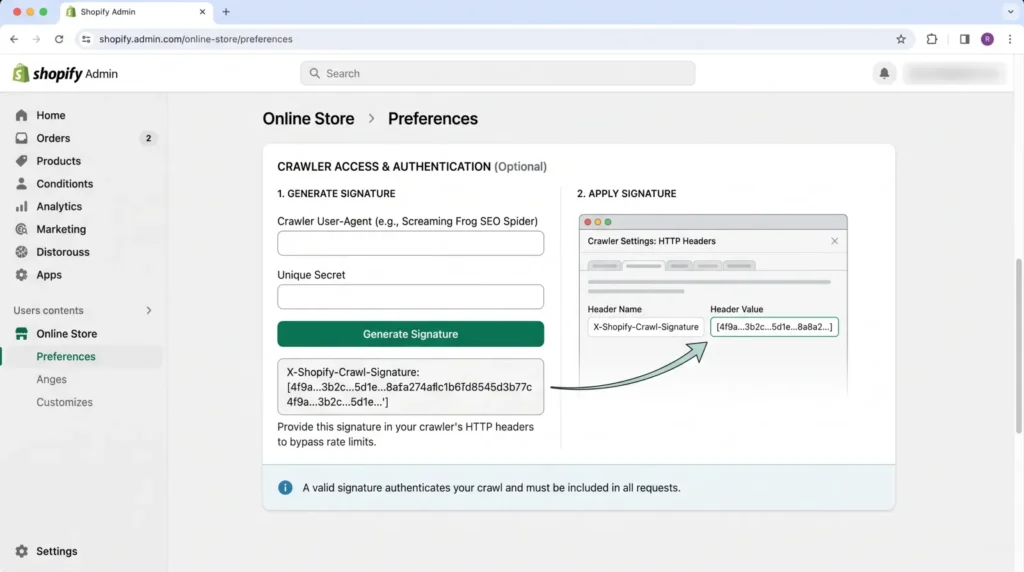
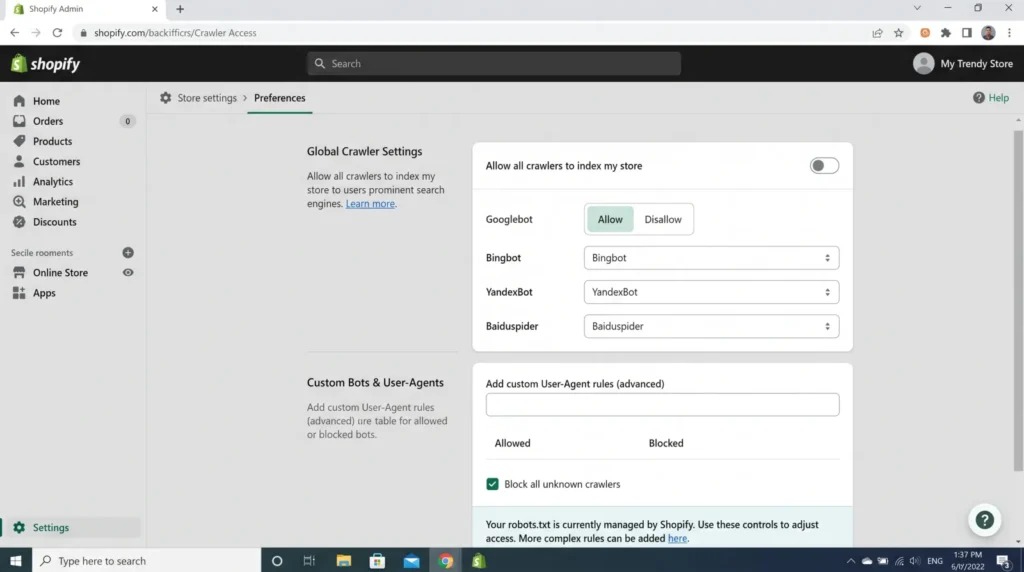
A crawler signature is a set of credentials you create in Shopify. It tells your store the crawler is yours, so Shopify stops rate-limiting it. Once it’s in place, the 429s stop.
In Shopify:
- Go to Online Store > Preferences.
- In the Crawler access section, click Create signature.
- Give it a name that includes the expiry date, for example “Screaming Frog, expires 30 Dec”. The reason is covered in the next section.
- Choose the domain. A signature only works on the connected domain you pick.
- Choose how long it’s valid for. Three months is the maximum.
- Click Create, then copy the Signature-Input and Signature values.
In Screaming Frog, go to Configuration > HTTP Header and add three headers:
| Header name | Value |
| Signature-Input | The value you copied from Shopify |
| Signature | The value you copied from Shopify |
| Signature-Agent | “https://shopify.com” (including the quote marks) |
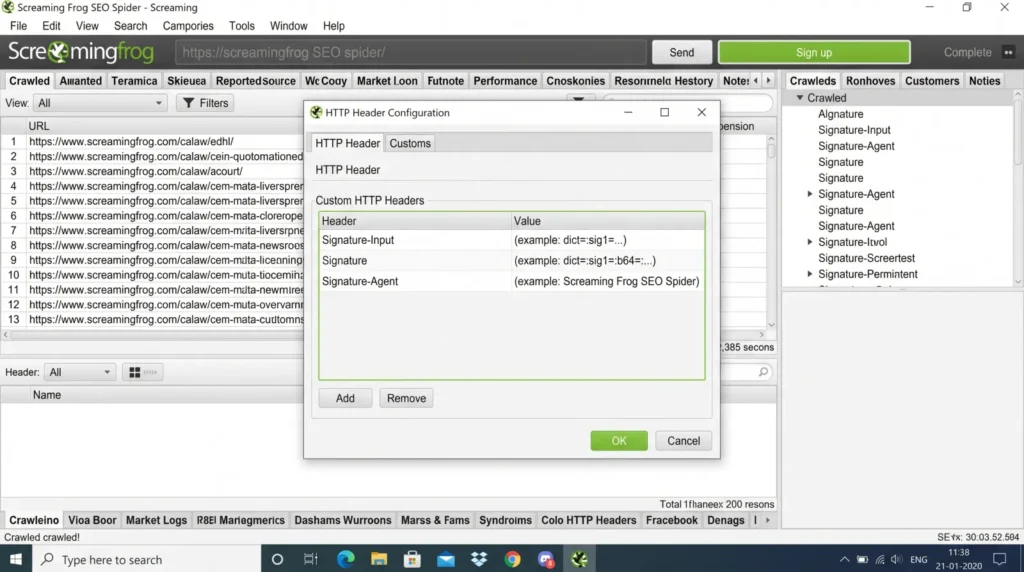
Crawl the exact domain the signature was created for. If you still get 429s, Shopify is rejecting the signature. Check that the header names are spelled exactly as above, that the signature hasn’t expired, and that you’re crawling the right domain. Shopify’s help page has the full details.
Why have the 429 errors come back on a saved crawl?
You set up a signature, saved the configuration, and it worked. A few months later, you load the same saved profile, press start, and the 429s are back.
Signatures expire and can’t be renewed. Your saved configuration still holds the old headers, so Shopify treats the crawl like any other bot. Create a new signature, paste the new values into Screaming Frog and save the configuration again.
An old signature keeps working until its original expiry date. That means you can create the replacement a week or two early and swap it in without a gap, which is why the expiry date belongs in the name.
The fix is a crawler signature, which Shopify introduced in August 2025 to let store owners authorise their own tools.
Should you use memory or database storage?
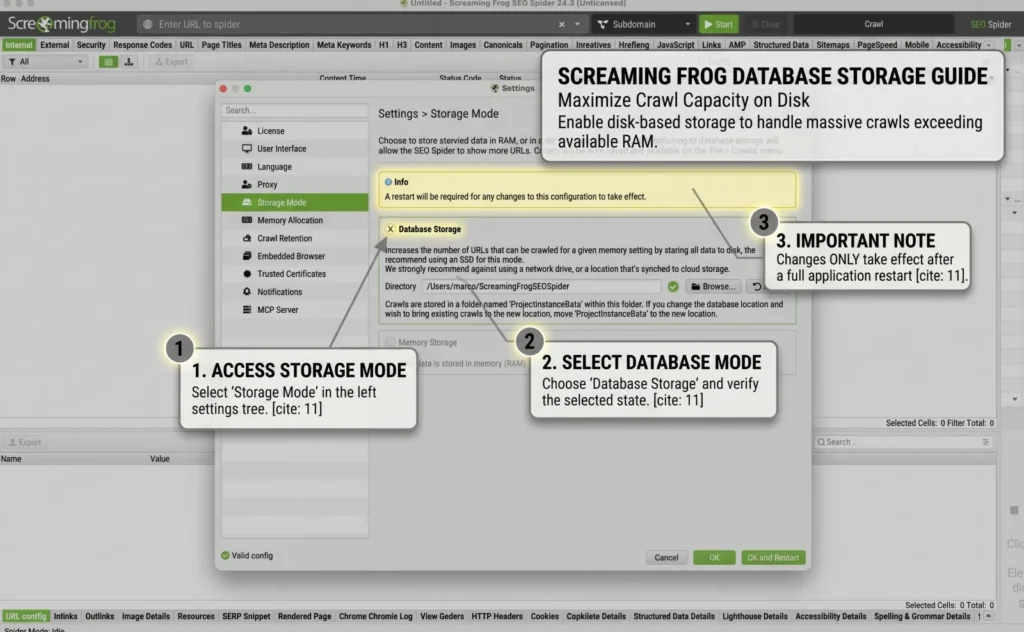
By default, Screaming Frog stores crawl data in your computer’s memory (RAM). That’s fine for a small site. On a large site, it fills the memory, and the crawl crashes partway through.
If your computer had
Switch to database storage, which saves crawl data to your hard drive instead. It’s under File > Settings > Storage Mode on Windows, or Screaming Frog SEO Spider > Settings on a Mac. Use a fast internal drive rather than a network or cloud-synced folder. Database mode also keeps your crawls, so you can reopen them later and compare one crawl with the next.
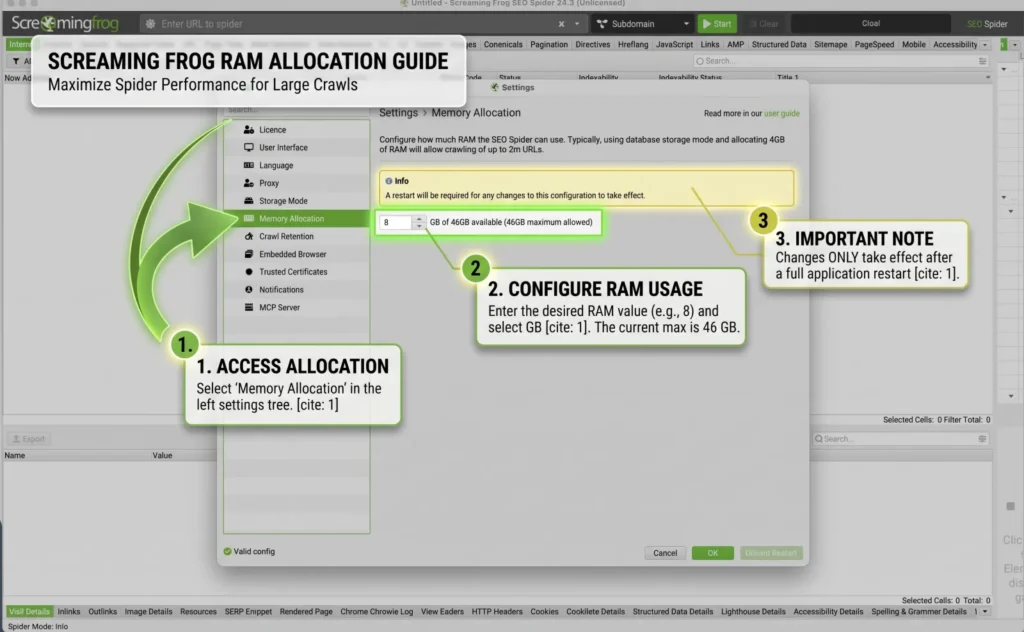
Additionally, you can use the amount of RAM allocated to the crawl. By default, Screaming Frog allocates 4 GB of RAM; this can be increased depending on the amount of RAM available on your machine. However, if you are using the computer while the crawl is running, you can run out of RAM, and the crawl or entire computer may crash.
Why should you mark Shopify’s CDN as internal?
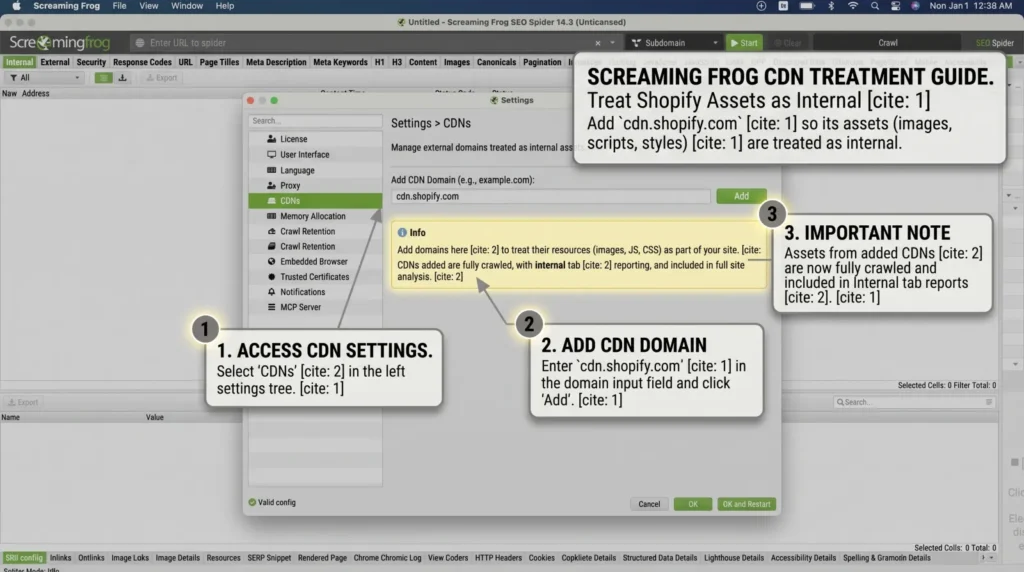
Shopify serves images and theme files from its own content delivery network, cdn.shopify.com. Screaming Frog treats any other domain as external, so by default your product images land in the External tab rather than the Images tab. The image checks later in this guide, such as missing alt text and file size, are then quietly skipped.
Add cdn.shopify.com under Configuration > CDNs so Screaming Frog treats it as part of your site.
How do you stop filter, sort and variant URLs bloating the crawl?
To a crawler, every one of these is a separate URL:
- each filter option
- each sort order
- each product variant
- each collection path
- each tag
- each page of results
Let Screaming Frog follow all of them and a 5,000-product store can look like a 100,000-URL monster. The crawl takes far longer and eats memory, and the real problems get buried under duplicates.
Run a short test crawl first. Stop it after a few minutes and look at the URL tab to see which patterns are piling up. That tells you what to exclude, and it’s your evidence for the duplicate URL checks later on.
Then keep those URLs out of the main crawl. Under Configuration > Exclude, add a pattern for each, for example:
.*sort_by=.*
.*filter\.[pv]\..*
For variant URLs (?variant= followed by a number), use Configuration > URL Rewriting > Remove Parameters and add variant. Screaming Frog then treats each variant link as the main product URL.
This only stops Screaming Frog from following those URLs. Whether Google can reach them is a separate question, covered in the duplicate URL checks below.
When do you need JavaScript rendering on Shopify?
Screaming Frog’s default mode, Text Only, reads the HTML Shopify sends before any JavaScript runs. Some apps add their content afterwards, with JavaScript. Review widgets and product recommendation blocks are common examples. Google renders JavaScript too, but as a separate step after crawling the HTML.
If an app adds important links or text that way, a Text Only crawl misses it completely. Products linked only from a “you might also like” block look orphaned, and pages look thinner than they are. You can spend a day fixing problems that don’t exist and miss the ones that do.
You don’t necessarily need to render the whole store, which is slower and heavier. Start with a sample:
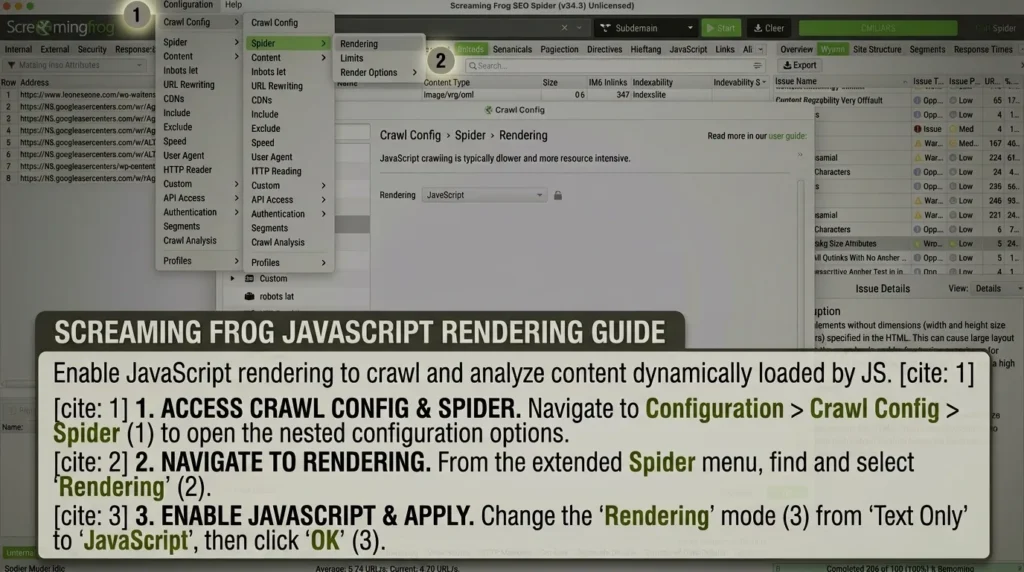
- Switch to Mode > List and paste in your homepage plus two or three collections, products, blog posts and pages.
- Turn on JavaScript rendering under Configuration > Spider > Rendering.
- Crawl, then compare word counts and outlinks with the same URLs from your Text Only crawl. The JavaScript tab also flags pages where rendering changes the content.
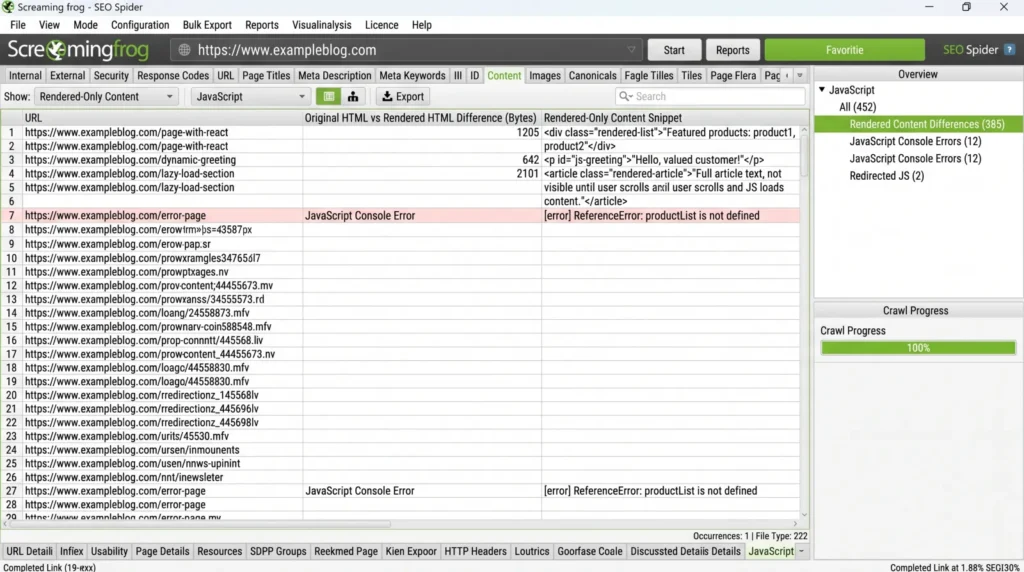
If the rendered versions have links or text that matter, render the full crawl. That’s one more reason to use database storage.
How do you crawl a password-protected or staging store?
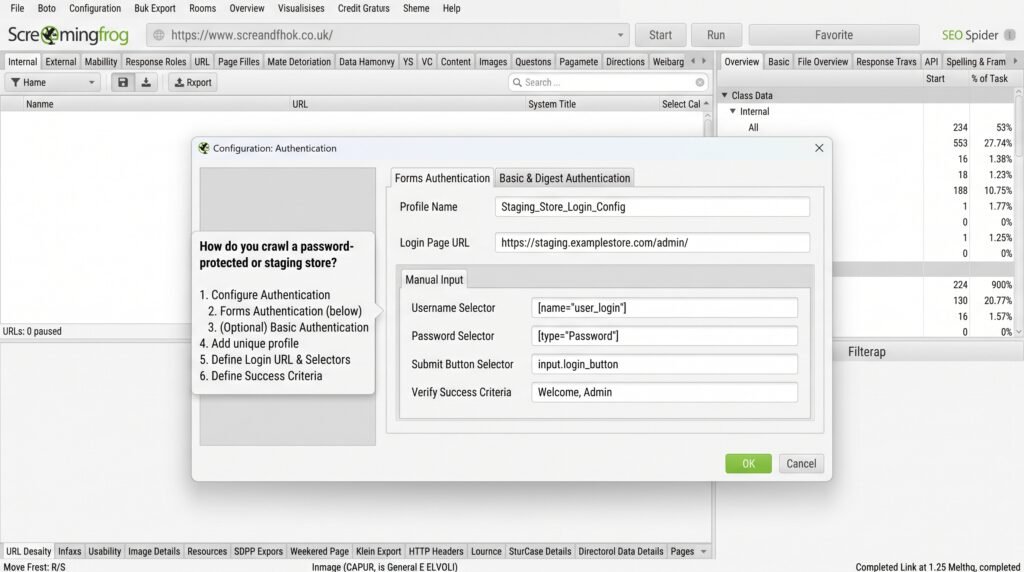
Type the address of a store that’s still behind Shopify’s password page into Screaming Frog, press start, and you’ll crawl the password page over and over. Every URL leads back to it. To get past it, give Screaming Frog the store password using forms-based authentication, which needs a paid licence.
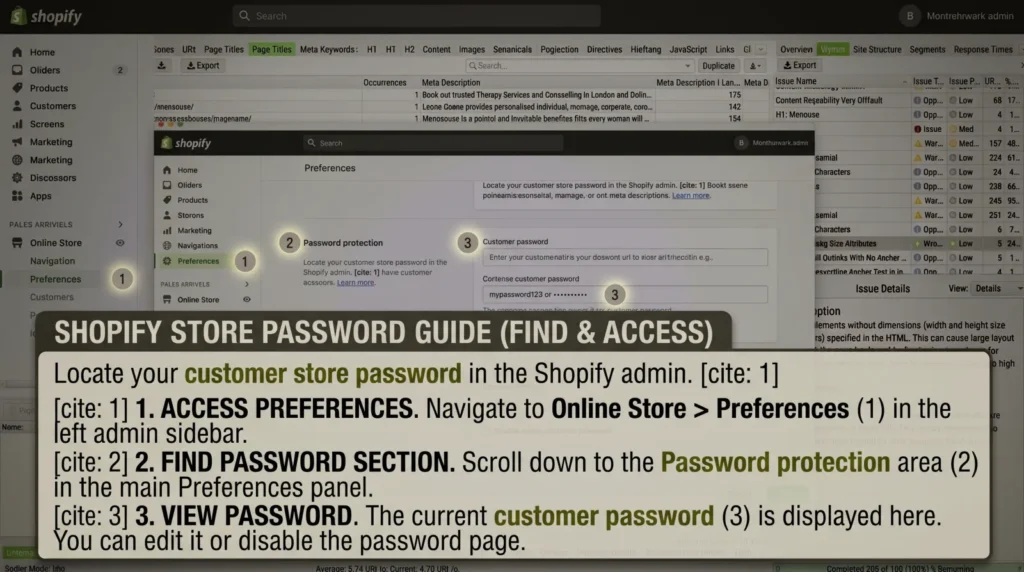
Find the store password in your Shopify admin under Online Store > Preferences > Password protection. Use only this storefront password. Never log in to the Shopify admin or a customer account in Screaming Frog’s browser, because it clicks every link it finds while logged in.
Screaming Frog’s guide to crawling password-protected sites recommends logging in with access that can’t edit anything, which is exactly what the storefront password gives you.
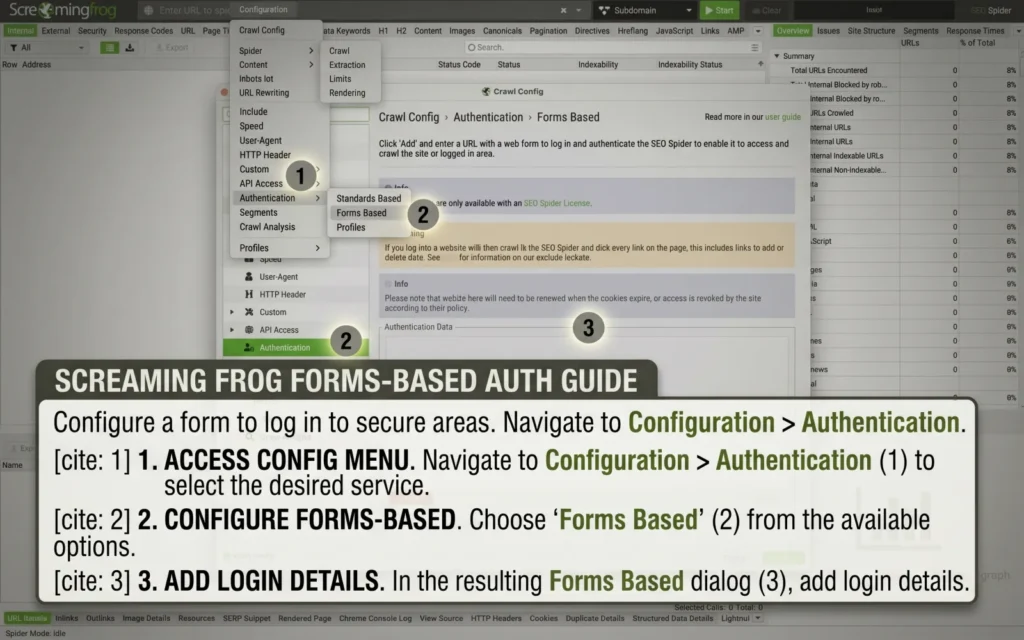
- Open the authentication settings. Go to Configuration > Authentication and open the Forms Based tab.
- Add your store. Click Add and enter your store’s address.
- Enter the password. Screaming Frog opens its built-in browser on your password page. Type the store password and submit it, just as a shopper would.
- Save the login. When the homepage loads, close the browser and click OK. Screaming Frog keeps the login for the crawl.
What else should you set before you start?
Four more settings make the rest of this guide quicker.
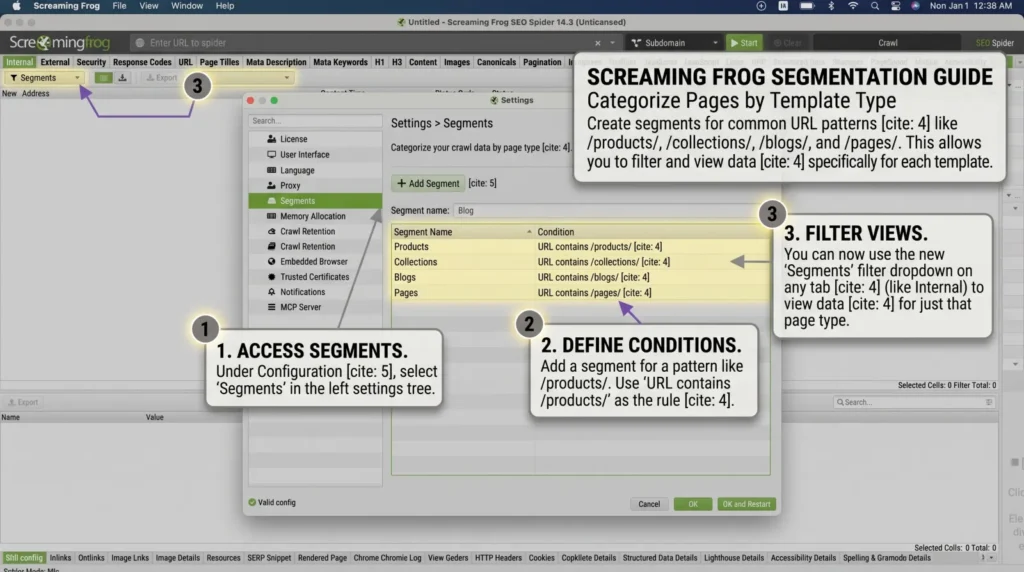
Set up segments by page type. Under Configuration > Segments, create segments for URLs containing /products/, /collections/, /blogs/ and /pages/. You can then filter every tab by page type, which matters when you get to fixing by template.
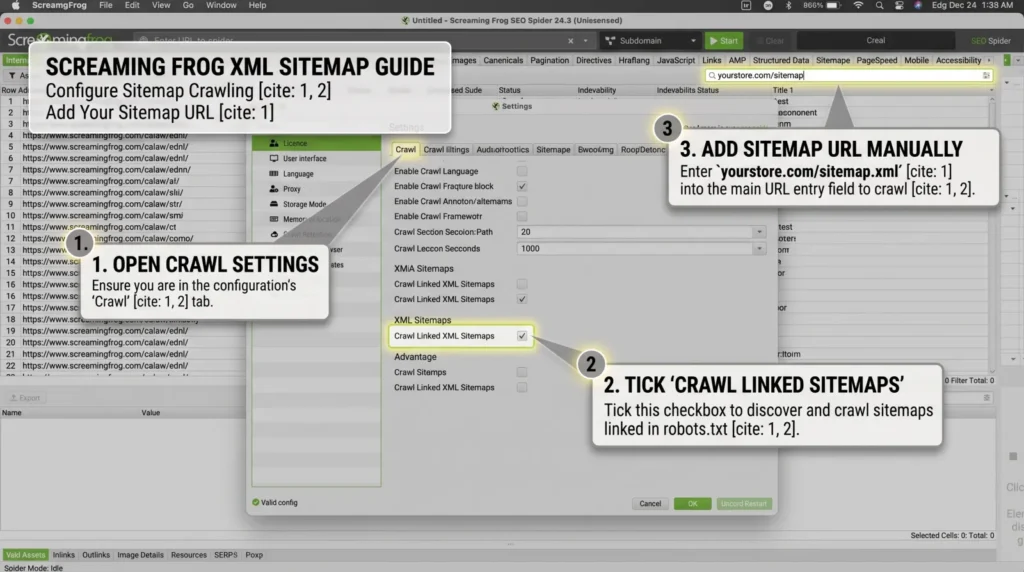
Crawl the XML sitemap too. Under Configuration > Spider > Crawl, tick the options to crawl linked XML sitemaps and add yourstore.com/sitemap.xml. Shopify’s sitemap is an index linking to separate sitemaps for products, collections, pages and blog posts. You need it for the orphan page check.
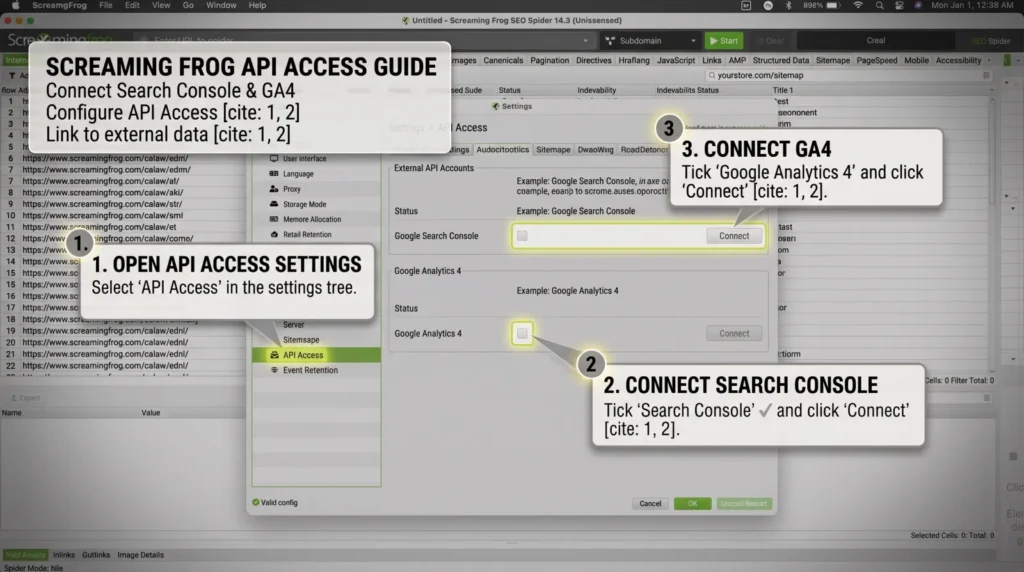
Connect Search Console and GA4 under Configuration > API Access. This adds clicks, sessions and revenue to every URL, which you’ll use to decide what to fix first.
Save the configuration with Configuration > Profiles > Save As, and put the signature expiry date in the file name.
What should you look for in a Shopify crawl?
When the crawl finishes, run Crawl Analysis > Start. Some checks, including orphan pages and sitemap gaps, stay empty until you do.
The checks below are grouped by type. Each covers what the problem is, where to find it, and the short version of the fix.
Duplicate and wasted URLs
Product links that go through collection paths
On Shopify, the same product can live at /products/linen-shirt and at /collections/shirts/products/linen-shirt. It gets one more URL for every other collection it sits in. Shopify points the canonical tag on all of them to the /products/ version, so Google is told which one to keep.
The problem is your internal links. If your theme links to the collection-path version, every product link on every collection page points to a URL Google has been told to ignore. The page you want to rank gets fewer direct links as a result.
To find it, filter the Internal tab of your test crawl for URLs containing both /collections/ and /products/, then check Canonicals > Canonicalised.
The fix is a theme change. Some themes build product links with a Liquid filter called within: collection, and removing it makes the links point straight at /products/. It’s a job for whoever maintains your theme.
Variant URLs
Each colour or size can have its own URL ending in ?variant= and an ID number. These canonicalise to the main product, so on their own they’re rarely a problem. Check that the canonical is there and points to the product, then move on.
Filter and sort URLs
Filter URLs (containing filter.v. or filter.p.) and sort URLs (containing sort_by=) can multiply into thousands of pages showing the same products in a different order. Shopify’s default robots.txt blocks some of these combinations.
In your test crawl, look for filter and sort URLs that are linked, not blocked by robots.txt, and indexable. The fix depends on your theme and filtering app, and covers it in full.
Collection tag pages
Every product tag creates a filtered version of each collection, at URLs like /collections/shirts/linen. These usually share the parent collection’s description and content, and sometimes its title too. The result is a set of near-identical pages competing with each other.
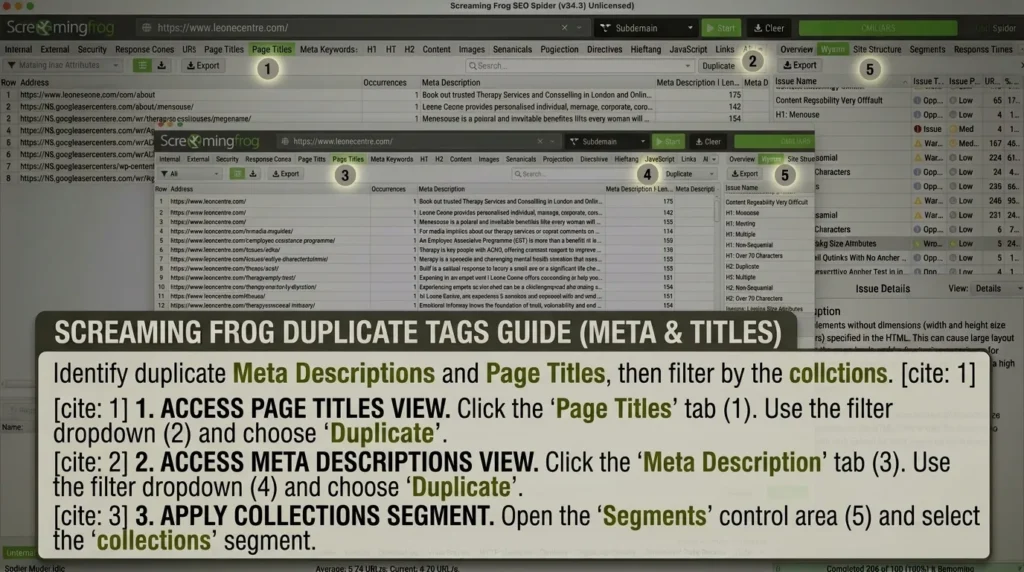
Check Meta Description > Duplicate and Page Titles > Duplicate, filtered to the collections segment. If a tag page is worth ranking because people genuinely search for “linen shirts”, give it its own title and description. If not, stop linking to it or noindex it.
Blog tag pages
Blog tags do the same thing at /blogs/news/tagged/tag-name, and they’re usually thin lists of post titles. Same check, same fix.
Pagination
Long collections split into /collections/shirts?page=2, ?page=3 and so on. Check that Screaming Frog can actually reach page 2 onwards. If your theme uses a “load more” button or infinite scroll, products deep in a collection may only be reachable with JavaScript. That’s another reason to run the rendering comparison above.
Broken links and redirects
404s from deleted products and collections.
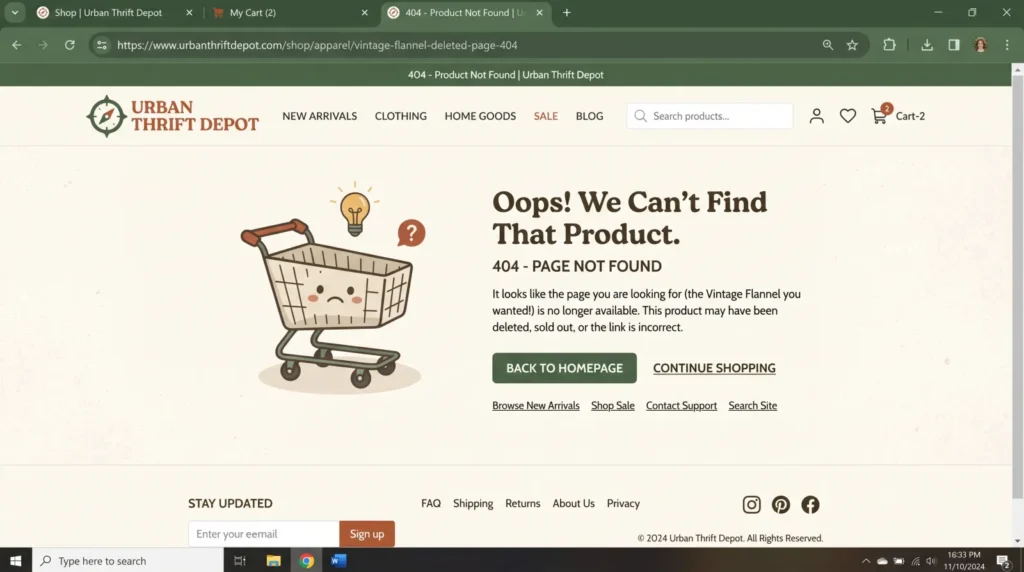
When a product is deleted, its URL starts returning a 404 error. The links to it stay where they were: in blog posts, menus, other product descriptions and collection text.
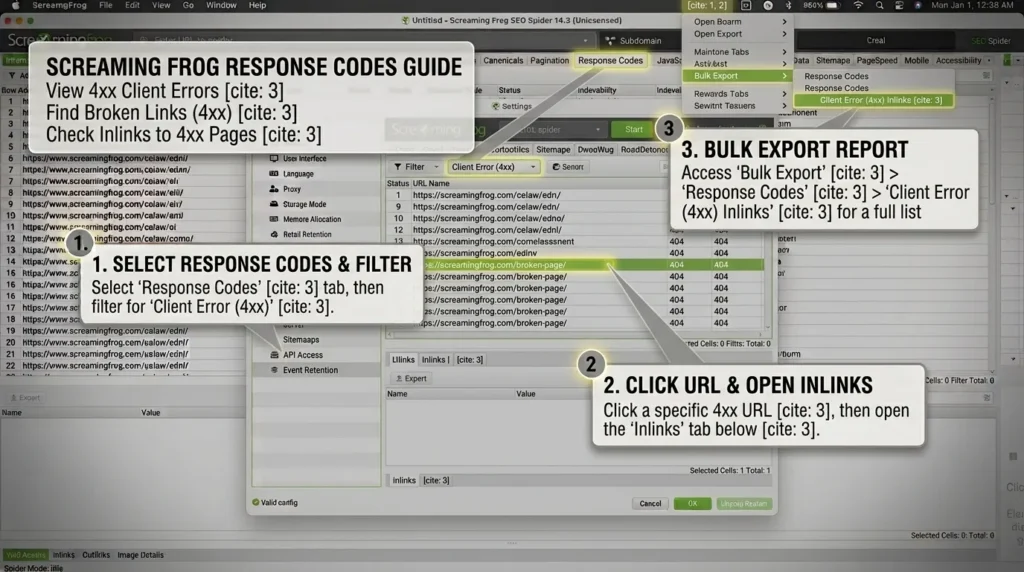
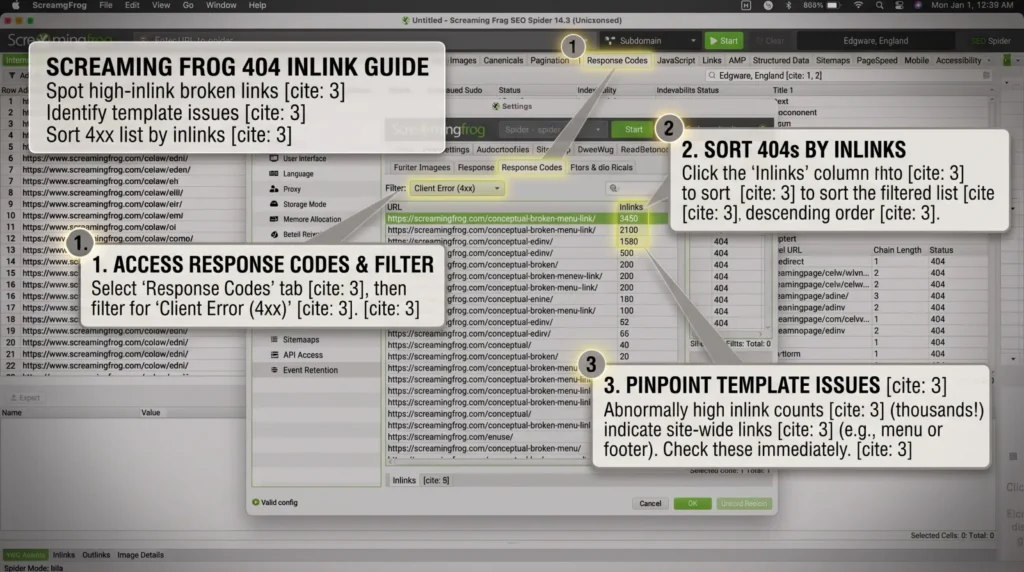
Find them under Response Codes > Client Error (4xx). Click a URL and open the Inlinks tab at the bottom to see which pages link to it, or use Bulk Export > Response Codes > Client Error (4xx) Inlinks for the full list.
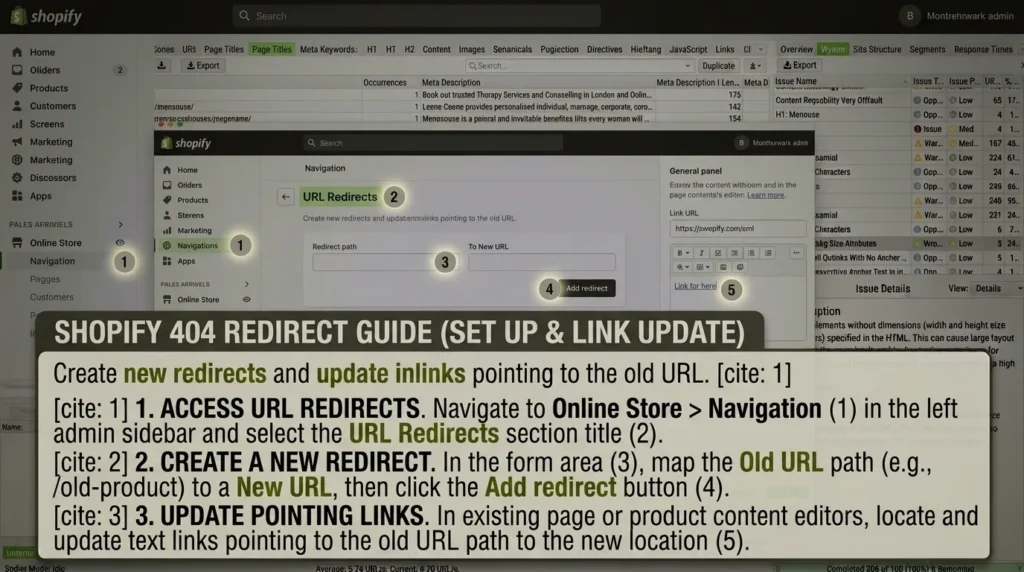
Set up a redirect in Shopify’s URL redirects and update the links pointing to the old URL.
Redirect chains
After a migration or a few product handle changes, an old URL can redirect to another URL that redirects again. Each extra hop slows the page down for shoppers.
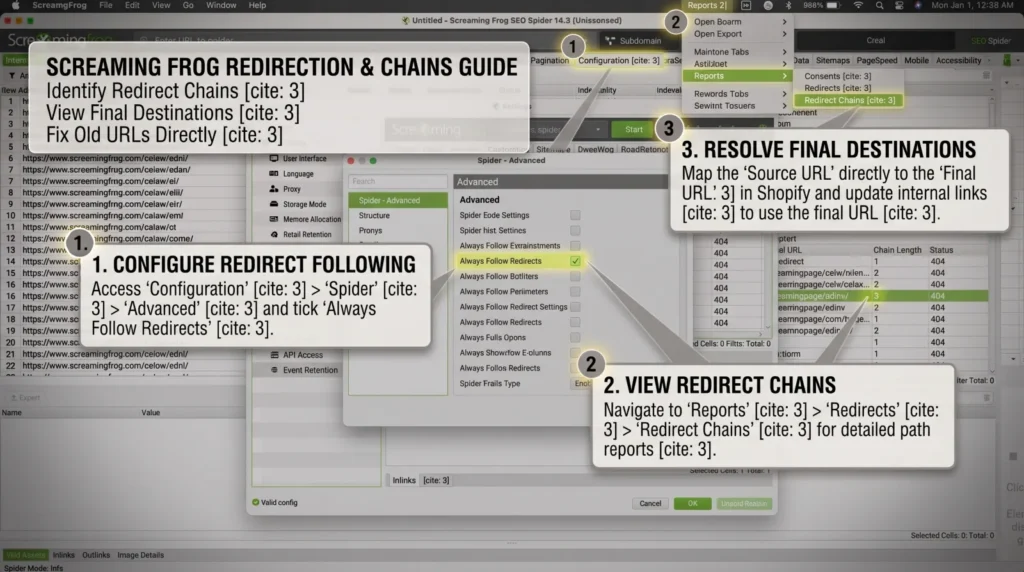
Make sure Screaming Frog follows redirects to the end (Configuration > Spider > Advanced > Always Follow Redirects). Then check Reports > Redirects > Redirect Chains. Point each old URL straight at its final destination in Shopify’s URL redirects, and update internal links to use the final URL.
Broken links in the menu or footer
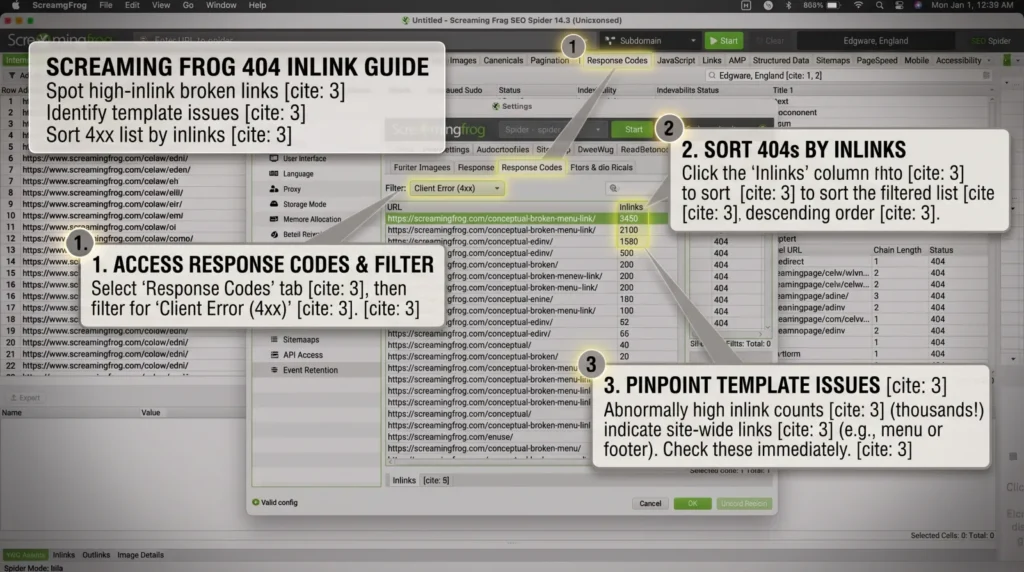
A broken link in the main menu or footer appears on every page. In Screaming Frog, it shows up as a single 404 with thousands of inlinks. Sort the 4xx list by inlinks, and these jump to the top. They’re usually the quickest big fix in the whole audit.
Links to your .myshopify.com address
Links copied from the Shopify admin or a theme preview sometimes point at yourstore.myshopify.com instead of your real domain. Shopify redirects them, but each one is an unnecessary redirect. Filter the External tab for myshopify.com, then edit each link wherever it lives, usually a page, blog post or menu item.
Indexing signals
Canonicals pointing the wrong way
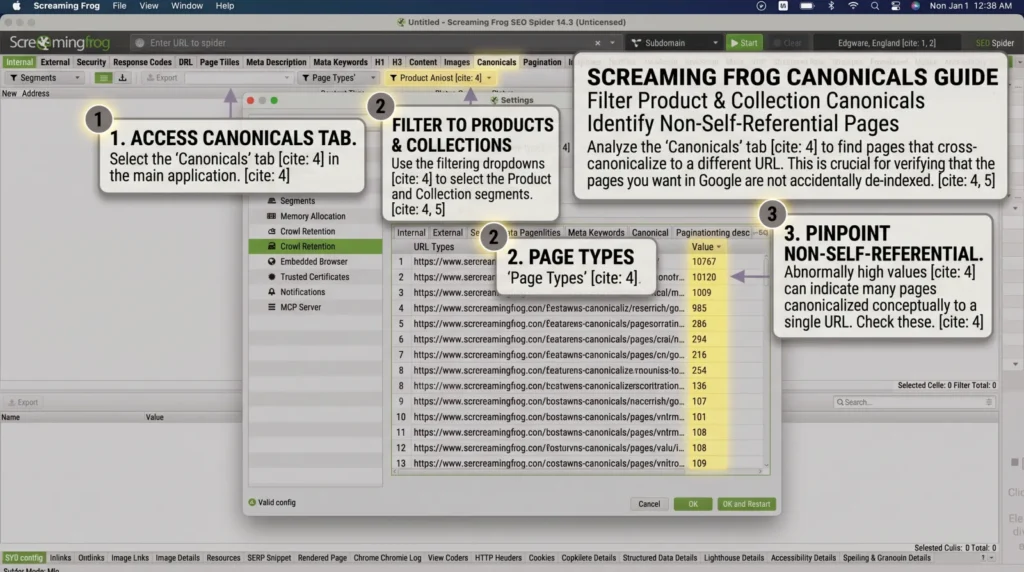
The Canonicals tab shows which pages point their canonical somewhere else. Filter to products and collections and look for any page you want in Google that’s canonicalised to a different URL. If you spot a pattern, check the theme’s head code and any SEO apps for a canonical tag that’s been hardcoded or overridden.
Noindex on pages that should rank
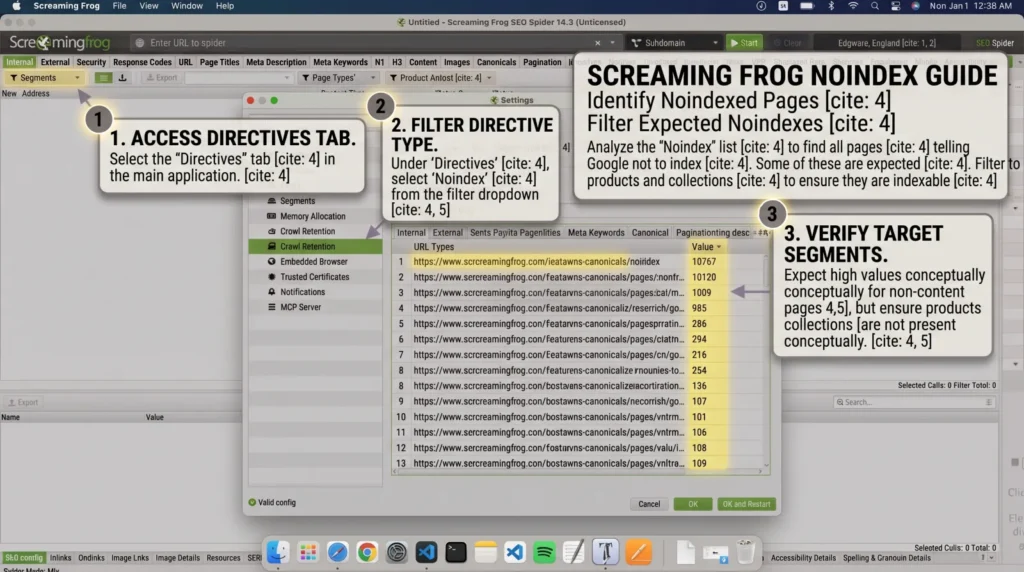
Directives > Noindex lists every page telling Google not to index it. Some of these are expected. Filter to products and collections: any page there that you want in search results is a problem. SEO apps, page builders and theme settings can all add noindex, so check each one you use.
Orphan pages and sitemap gaps
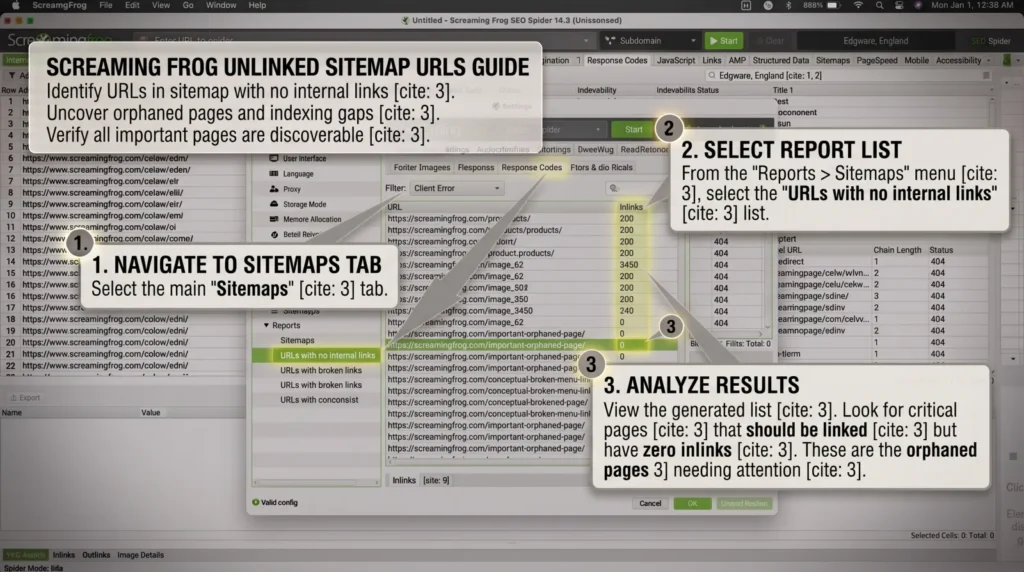
With the sitemap crawled and Crawl Analysis run, the Sitemaps tab gives you two useful lists. The first is URLs in the sitemap that nothing on the site links to. On Shopify, these are often products that aren’t in any collection, or old landing pages. The second is indexable URLs missing from the sitemap. Parameter URLs belong there and are fine, but a real page, such as a collection, shouldn’t be missing.
If you connected Search Console and GA4, Screaming Frog can also flag pages that get traffic but weren’t found in the crawl.
Titles, headings and content
Missing, duplicate and default titles and meta descriptions
Check the Page Titles and Meta Description tabs under Missing, Duplicate and the length filters.
If you leave the SEO fields blank, Shopify fills them from the product or collection name and description. Duplicates usually cluster on tag pages, paginated collections and products with near-identical names. Fix the template first, then write titles and descriptions by hand for your most important pages.
Missing or multiple H1’s
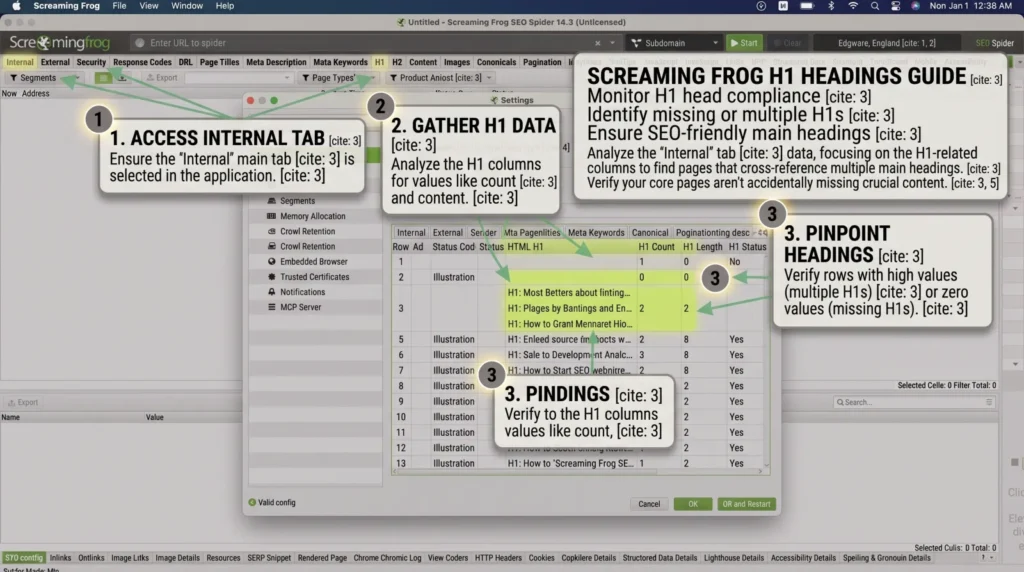
The H1 tab shows pages with no main heading, or more than one. On Shopify, this nearly always comes from the theme, for example, a logo or section heading coded as an H1. Filter by segment. If every product page has the same issue, it’s one fix in the product template.
Collections with no description
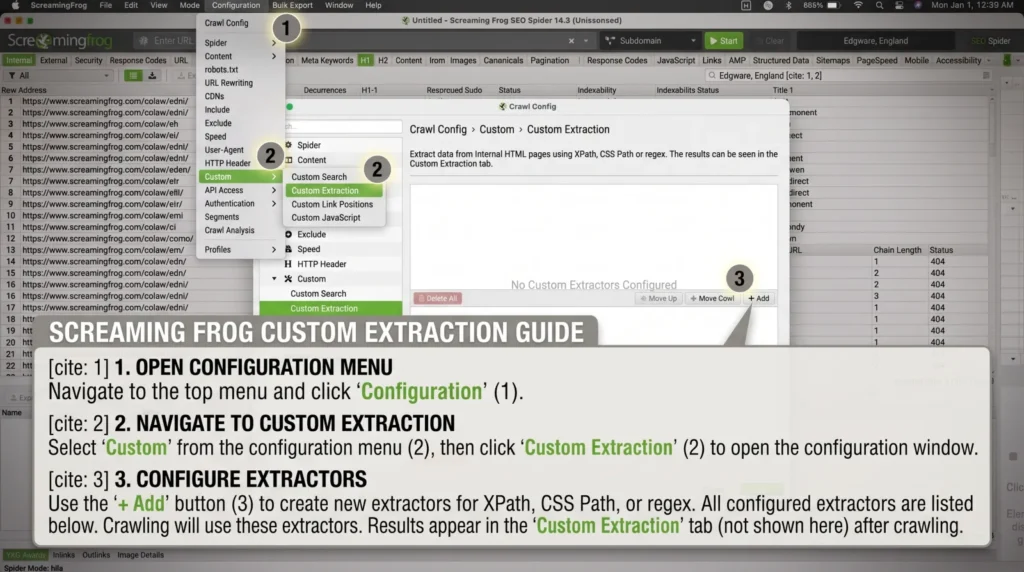
Collection pages are often a store’s strongest pages for search, and many have no text beyond the product grid. Use custom extraction (Configuration > Custom > Custom Extraction) with a CSS selector for your theme’s collection description, then sort the results to find the empty ones.
Product descriptions copied from the manufacturer
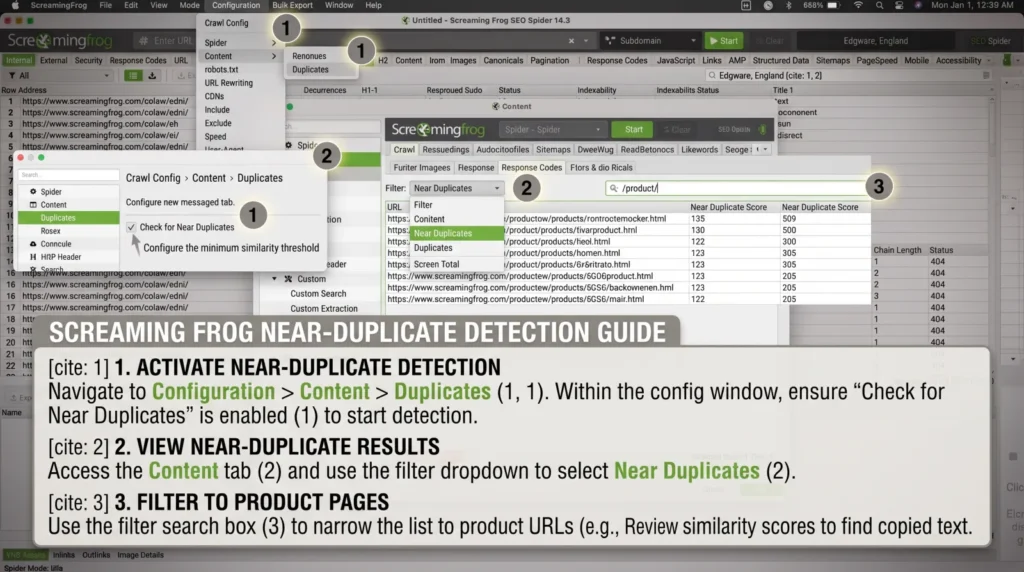
Turn on near-duplicate detection (Configuration > Content > Duplicates) and look at Content > Near Duplicates, filtered to products. This finds products in your store sharing the same or very similar descriptions.
It won’t tell you whether the same text appears on other retailers’ sites, which is common with supplier copy. For that, paste a sentence from the description into Google in quote marks.
Images and page speed
Missing alt text & large image sizes
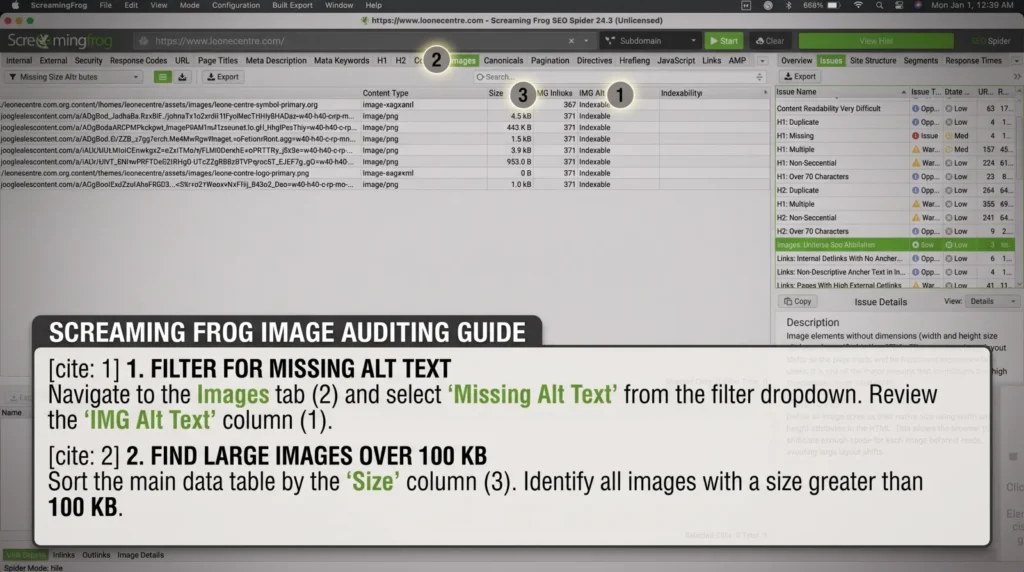
Check Images > Missing Alt Text. This only picks up product images if you marked the Shopify CDN as internal during setup. Add alt text to each image in the product’s media section in Shopify.
Check Images > Over 100 KB. Look for patterns. If the same heavy file shows up on every page, it’s probably a theme or app asset rather than a product photo, and fixing it once helps the whole site.
Core Web Vitals
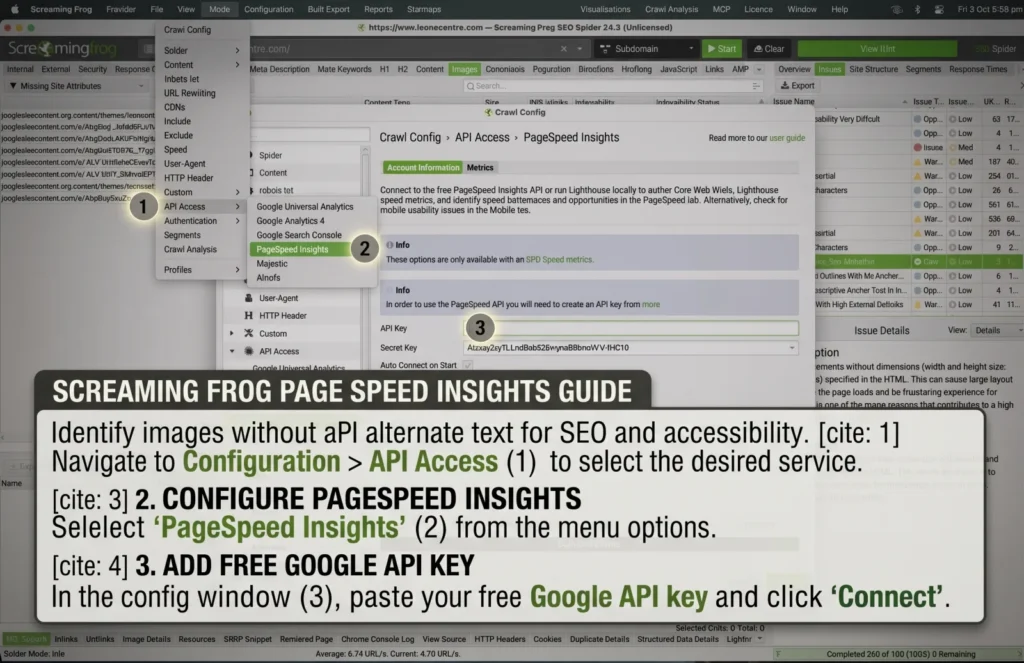
Connect the PageSpeed Insights API under Configuration > API Access, using a free Google API key. Run it on a sample of each template in list mode rather than on the whole store. The PageSpeed tab then shows loading, responsiveness and layout shift for each page. covers what to do with the results.
Structured data
Missing or duplicate product markup
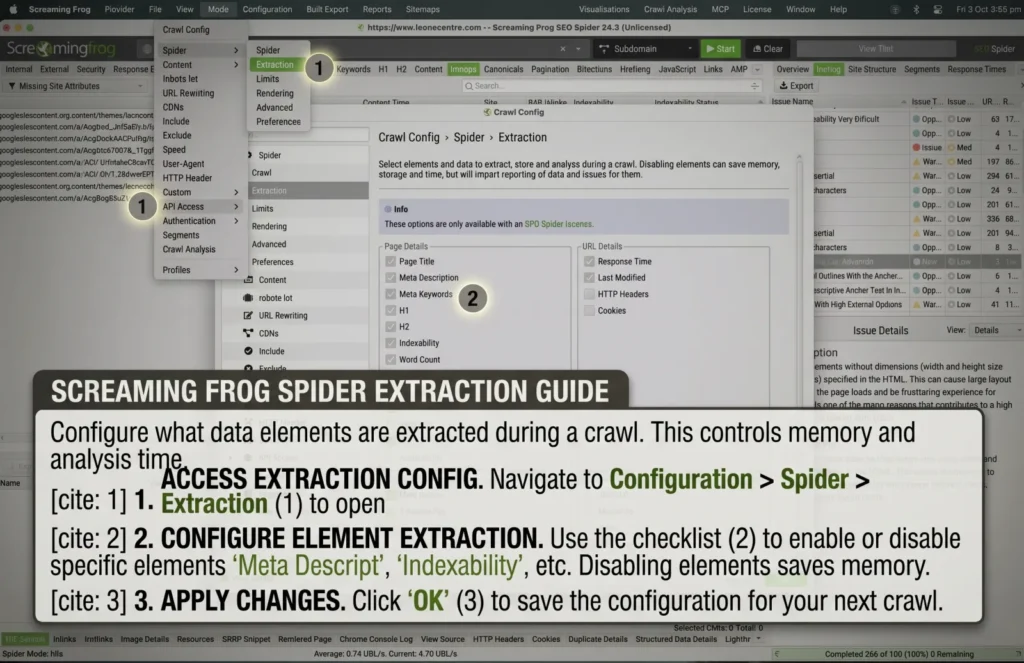
Structured data is code that tells Google a page is a product, with its price, stock status and reviews. Turn on structured data extraction and validation under Configuration > Spider > Extraction. Then check the Structured Data tab, filtered to products, for missing markup, validation errors and warnings.
Two things to look for on Shopify. First, whether product pages include price and availability, which Google needs for product rich results. Second, whether the theme and a reviews app are both adding Product markup, leaving each page with two versions that don’t match.
Selling abroad
Hreflang with Shopify Markets
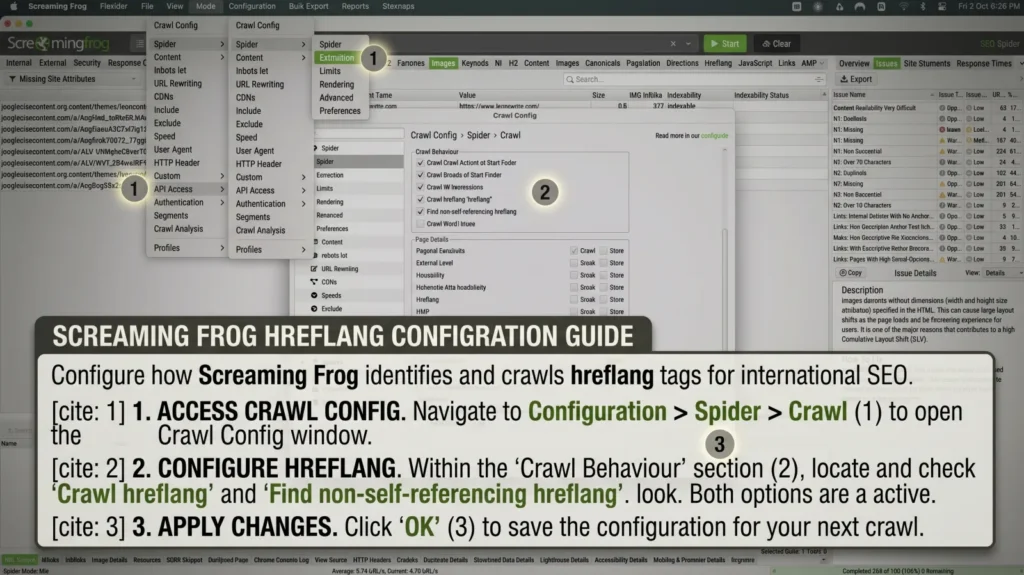
If you sell abroad through Shopify Markets using subfolders (such as /en-us/) or separate domains, Shopify adds hreflang tags. These tell Google which version of a page to show in which country. Turn on hreflang under Configuration > Spider > Crawl, then check the Hreflang tab for missing return links, links to broken pages and other errors.
Where to find each issue
| Issue | Where in Screaming Frog | Who usually fixes it |
| 429 errors | Response Codes > Client Error (4xx) | Whoever runs the crawl (signature) |
| Collection-path product links | Canonicals > Canonicalised | Theme developer |
| Filter and sort URLs | URL tab (test crawl) | Theme developer or filter app |
| Tag page duplicates | Meta Description > Duplicate | Content |
| 404s | Response Codes > Client Error (4xx) | Store admin (redirects) |
| Redirect chains | Reports > Redirects > Redirect Chains | Store admin |
| Links to .myshopify.com | External tab | Content |
| Wrong canonicals | Canonicals tab | Theme developer or SEO app |
| Unwanted noindex | Directives > Noindex | App settings |
| Orphan pages | Sitemaps tab | Merchandising |
| Duplicate titles | Page Titles > Duplicate | Content, then theme |
| Missing or multiple H1’s | H1 tab | Theme developer |
| Empty collection descriptions | Custom Extraction | Content |
| Near-duplicate descriptions | Content > Near Duplicates | Content |
| Missing alt text | Images > Missing Alt Text | Content |
| Heavy images | Images > Over 100 KB | Theme developer or content |
| Structured data errors | Structured Data tab | Theme developer or app |
| Hreflang errors | Hreflang tab | Store admin (Markets settings) |
How do you turn a crawl into a fix list?
A Shopify crawl can flag thousands of issues. Most don’t matter much, and a few matter a lot. Two habits separate the two.
Start with the pages that make money
With Search Console and GA4 connected, every URL has clicks, sessions and revenue next to it. Sort each issue list by those columns before doing anything else. A missing meta description on a product nobody visits can wait. A 404 linked from your best-selling collection can’t.
Export the issues you’re going to fix into one sheet: the URL, the issue, the traffic or revenue it carries, and who owns the fix. That sheet is your plan.
Fix templates, not pages
Every product page on a Shopify store uses the same template, or one of a few, and the same goes for collections, blog posts and pages. So when an issue shows up on nearly every URL in a segment, it lives in the theme. One change to the template fixes it everywhere.
Count issues by segment before you assign any work. “Every product page has two H1s” is one ticket for your developer, not 3,000.
As a rough guide to ownership:
- Theme problems such as links, canonicals, headings and structured data go to your developer.
- Titles, descriptions, alt text and collection copy go to whoever manages content.
- Unwanted noindex tags and duplicate markup usually sit in an app’s settings.
- Redirects belong to whoever runs the store admin.
What can you safely ignore?
Not everything Screaming Frog flags is a problem. On Shopify, these are expected:
- URLs blocked by robots.txt that Shopify blocks on purpose, such as the cart, checkout, account pages, internal search and some filter combinations . They’ll show as blocked, and that’s the point.
- Variant and collection-path URLs that already canonicalise to the main product. Fixing the internal links is worth doing, but Google is being told the right thing in the meantime, so it’s not urgent.
- App scripts and third-party files in the External tab.
How do you keep on top of it?
A single crawl tells you how the store looked on one day. Products come and go, apps get installed, and themes get updated, so problems creep back in between audits.
Schedule regular crawls
With a licence, File > Scheduling runs a crawl automatically with your saved configuration and exports the results. Weekly is the right rhythm for most stores. It’s often enough to catch a broken link or a stray noindex before it costs you much traffic, and the setup runs itself.
Screaming Frog’s scheduled crawls can export to Google Sheets and feed a Looker Studio report. That way, each week’s issues sit in a dashboard rather than in a folder nobody opens.
Scheduled crawls are where the signature expiry catches people out. The schedule keeps running, Shopify starts rejecting the old signature, and the exports fill with 429s without anyone noticing. Put the expiry date in your calendar and swap in a new signature a week or two early.
Compare crawls
In database storage mode, Mode > Compare shows what changed between two crawls: new issues, fixed ones, and URLs that appeared or disappeared. It’s the quickest way to see whether a theme update broke something.
Crawl after any big changes
Run an extra crawl after any of these:
- a theme change or update
- installing or removing an app
- a migration or bulk URL change
- a large product import or deletion
- before peak trading
Put crawl data in a dashboard
Crawl exports sitting in a folder rarely get looked at. At Altomate, we pull Screaming Frog crawl data and Core Web Vitals that has been uploaded to Google Drive folder into a Technical dashboard in Data Studio (formaly Looker Studio). Developers and SEO teams can then track the site’s health week to week.
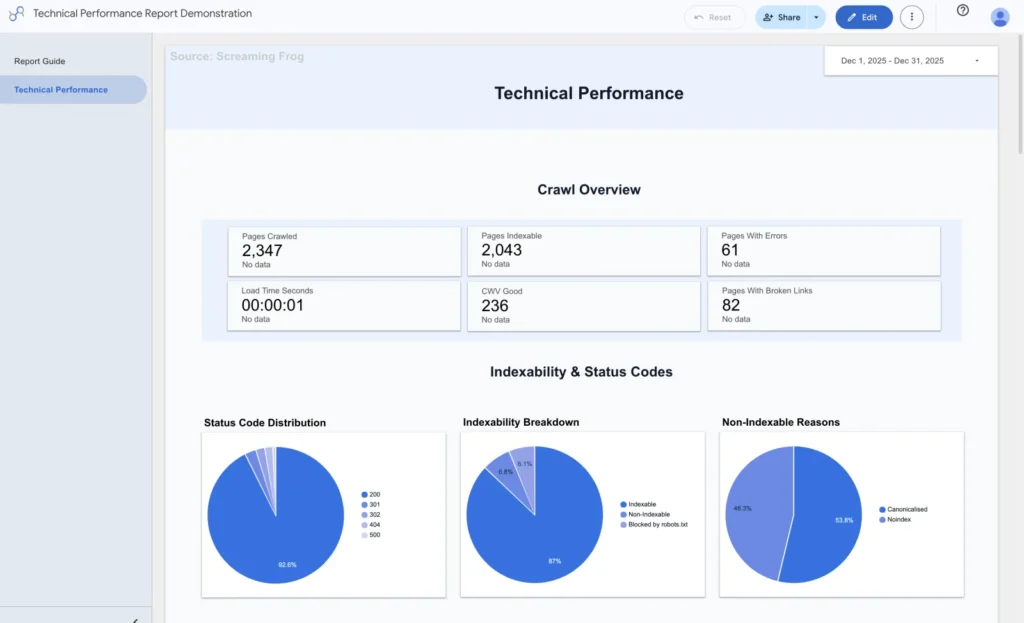
Setting that up yourself takes some work: the scheduled export, the sheet, and a report that’s quick to read. If you’d rather not build it, Altomate’s Insights Studio does it for you. We build branded Looker Studio dashboards that put your crawl data alongside Search Console, GA4 and your other sources. Then you are alerted via AI automation so problems get flagged the same day rather than at month end.
FAQ
Is Screaming Frog free for Shopify stores?
Up to 500 URLs, yes. The free version can’t change crawl settings, so it can’t use the Shopify signature, and it doesn’t include JavaScript rendering or Search Console and GA4 integrations. It’s fine for a first look at a small, new store. Beyond that, you’ll need a licence.
Why does Screaming Frog show 429 errors on my Shopify store?
Shopify limits how fast any one visitor can request pages. Screaming Frog goes faster than that, so Shopify sends back 429 Too Many Requests instead of the page. The fix is a crawler signature from Online Store > Preferences > Crawler access, added to Screaming Frog as HTTP headers.
Do Shopify crawler signatures expire?
Yes. They last up to three months and can’t be renewed. Create a new one before the old one runs out, and update your saved Screaming Frog configuration.
Does Shopify handle canonical tags automatically?
For variants and products reached through collection URLs, yes. Shopify points the canonical at the main /products/ URL. Themes and apps can override that, so check the Canonicals tab anyway.
Do I need JavaScript rendering to crawl Shopify?
Only if apps or your theme add important links or content with JavaScript. Crawl a sample of pages both ways and compare. If the rendered versions have links or text the Text Only crawl missed, render the full crawl.
Can I crawl a password-protected Shopify store?
Yes, with a paid licence, using forms-based authentication. Under Configuration > Authentication > Forms Based, add your store and enter the storefront password in Screaming Frog’s built-in browser, then crawl as normal. Only ever use the storefront password, never an admin or customer login.
How often should I crawl my Shopify store?
Run a scheduled crawl every week and feed the results into a Looker Studio report, so you can spot new problems without opening Screaming Frog. On top of that, crawl straight after any change that touches the whole site: a theme edit or update, installing or removing an app, a migration, or a bulk product import or deletion. New products and pages get picked up by the weekly crawl.
Get the Shopify SEO audit checklist
A crawl covers the technical side of Shopify SEO. For the rest of the audit, download the free Shopify SEO audit checklist.